I've been looking at pictures like this one from here,

and this one from here

for quite some time now.
I learned how to make my own chalkboard paint and schemed and planned.
Hubders was going to be out of town for three days and so, once he left, I got started.
Here's how it unfolded.
I filled in the dings and nail holes in the wall and then gave the wall two coats of the original paint so that it looked pristine in it's yellow loveliness.
Next, I carefully measured and taped off my calendar, making sure that the squares were large enough to write multiple items on each each day.

I then gave it one more coat of yellow so that all the feathery paint streaks that manage to worm their way under the tape would be the wall color.
Then I started painting my chalkboard paint. I was sooo excited!!
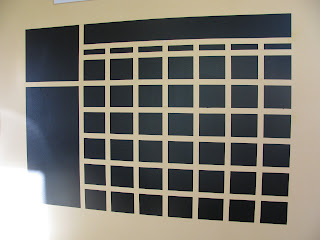
Not a great picture, but a great start! No vinyl title or labels yet, but it's a calendar with a place to leave notes and one to list family birthdays (and my daughters thought the optical illusion dots in between the squares were super cool).
The DIY chalkboard paint tutorial said that after you paint, you should sand it all lightly, which knocked off the black paint wherever there was a small bump from all the coats of paint and revealed lovely yellow dots randomly over the whole surface--not so pretty!

Then I was supposed to "prime" the chalkboard by covering the whole surface with chalk and erasing it all. Which I did. No picture of that one, but by this time, the whole thing is looking really sloppy.
Not working. It's sloppy, hard to read, and there's not room to write multiple appointments.

My next attempt was chalk markers, bright happy colors, smaller tips. This just might work.

However, unless you have a very smooth surface, they don't want to erase (and they're expensive).
This was after considerable elbow grease. Not a happy moment.

And all of the elbow grease smeared the color onto the yellow background (lousy picture, I know, but you can see the mess around the edges of the square--and I still didn't get the square clean).

There were possible fixes that I explored, but the more I looked into it, the more I realized I wasn't going to be happy with the results.
So I sanded and sanded, and sanded and sanded some more.

Then I painted and whimpered because I could still see those stupid calendar lines.

But, two more coats and the wall was back to it's lovely yellow shade. I went and bought a calendar and put up one of these for messages, backed with a black foam core board.
It's not quite what I was after but it's workable, and the DIY option was a total fail!
Ya live and learn!
I am sorry it didn't work!!! Wish I could have been there to help. Love you lots!
ReplyDeleteCan't even tell you how much I enjoyed this post. Love the DIY projects, love your narration, I was laughing out loud. I'm so sorry it didn't work, but huge KUDOS to you for your more-than-valiant effort. It was a fabulous idea. I'd give you a hug and take you out to Chevy's if I were there. :)
ReplyDeleteOh bother! I'm impressed by all the work you did! Sorry you don't have a beautiful finished product, though!
ReplyDeleteThat is the saddest story! But, had it worked, it would have been super cute!
ReplyDelete